This section describes how to use each feature of the Pool Pad partner system. The control application is written exclusively in hard logic as opposed to within a program, or in a program language, which is most common amongst other pool controlling products. As a result of PPP being an 'all hardware' design, there is nothing to crash or halt the system and its hardware is expandable via software (bitstream) upgrades. Each feature has a section of the screen where it displays its current status and is typically controlled using the RF remote controller that comes with the PPP system.
Using Pool Pad Partner with your pool
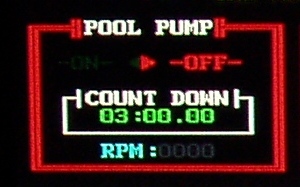
=] POOL PUMP [=
The 'Pool Pump' window has two indicators, ON and OFF. Each indicator will either be greyed out or illuminated green or red according to whether the pump is currently ON or OFF respectively. By pressing the '1' key on the handheld RF remote control for four seconds continually, the pump will turn on. When the pump turns on, it will operate for 3 hours, and the display will commence a countdown indicating the remaining time the pump has left to operate. By pressing the 2 key three times consecutively, the pump will turn OFF and reset any remaining time left on the three hour timer.
If an automatic feature is enabled, for example to run the solar system, the 'Count Down' function is frozen and will flash green until the solar system has finished using the pump to move hot water from the solar collectors to the pool, at which point the pump operation and countdown resumes. The RPM is currently manually fixed and reflects the setting on the Pentair pump down at the pump house. It's important to note that the RPM's are set manually to make the system compatible with the solar heating if the Jandy valves are not configured to regulate the water flow to the solar collectors. It is expected that future releases of PPP will automate the setting of the pump speed.
Once the Count Down is completed, the indicator will flip from ON to OFF and the ON indicator will be dimmed out, the arrow pointing to OFF.
=] CHLORINATOR [=
The 'CHLORINATOR' window indicates the status of the pool's Salt Water Chlorinator. PPP only turns the Chlorinator on or off. The Parts Per Milllion display is set manually at the chlorinator. The Chlorinator feature is enable by setting DIP SW7 of the Nanoboard to ON. Once enabled, the Chlorinator is turned both on and off with the pool pump during pool filtering operations only. When either the backwash feature or the solar system is activated, PPP turns off the chlorinator during these tasks.
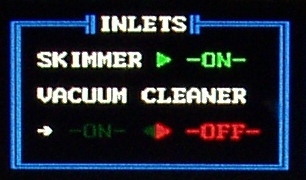
=] INLETS [=
The 'Inlets' window provides information regarding where the water is drawn from the pool to the pump. Under the Pool Pad model, the skimmer box is always enabled, and the optional Vacuum cleaner port is selectable as on or off. By pressing the '5' key down for several seconds on the RF remote control, the Vac port becomes active. If any tasks such as backwashing (to lower the draw pressure) sets the vac port on, the display will indicate that the port is enabled during that task only.
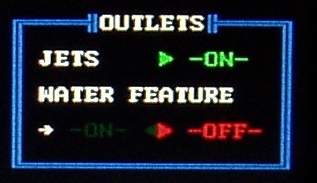
=] OUTLETS [=
The 'Outlets' window provides information regarding the method of returning the water from the pump system to the pool. Under the Pool Pad model, the water jets are always enabled and the optional water feature function may be selected as on or off by pressing the '6' key on the RF remote control for several seconds. For tasks that automatically activate this feature as part of their process, (for example to lower water resistance) the display will indicate whether the port is currently enabled for that task only.
=] BACKWASH [=
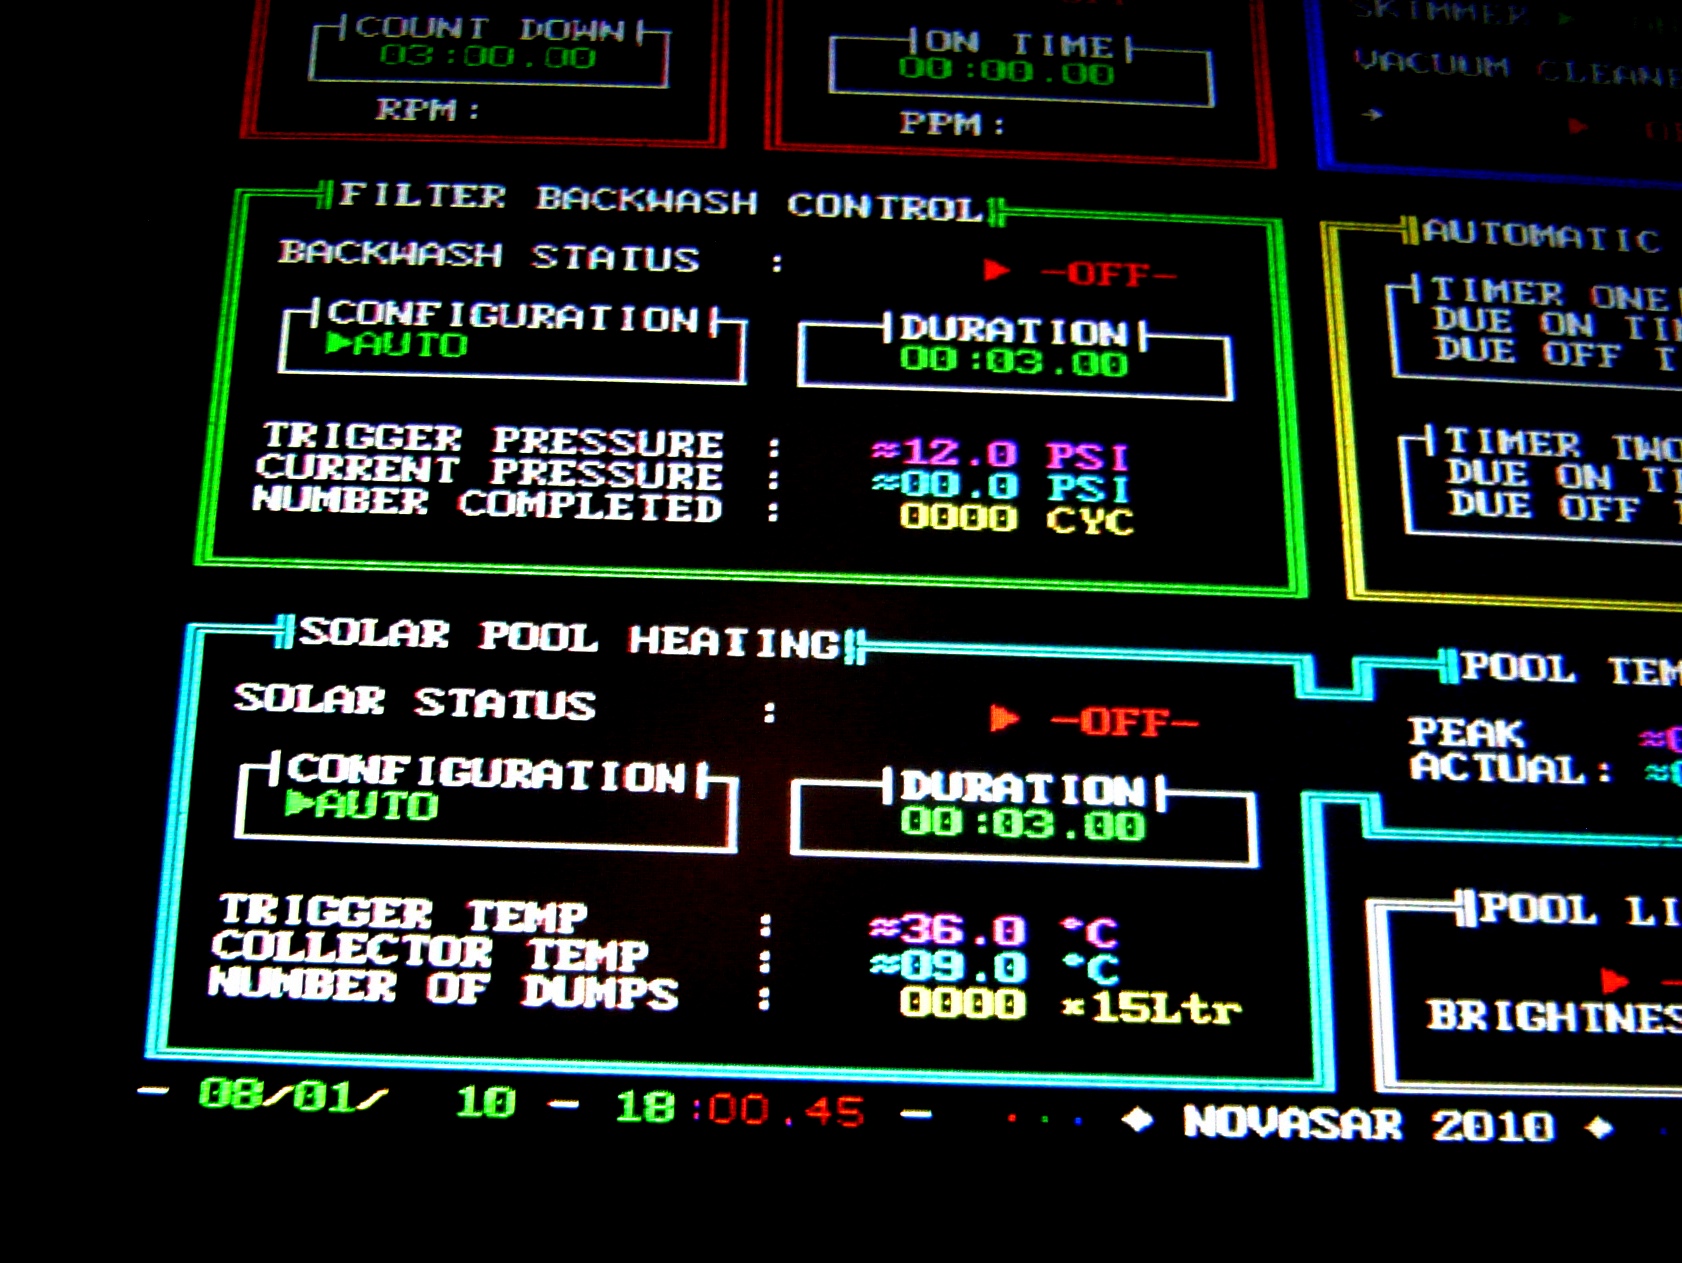
The 'Backwash' feature can be activated by pressing the '4' key of the RF remote control for several seconds. Once active, the backwash process sets the actuators on the Jandy backwash valve to "backwash" and runs the pump for 2 minutes. The automatic backwash feature is enabled by setting DIP SW1 of the Nanoboard to ON. Once enabled, the backwash task can occur automatically when the filter pressure reaches 12PSI. When the backwash process is initiated, either manually or automatically, it will run to completion and cannot be cancelled by the operator. If the solar dump trigger temperature is reached and the automatic hot water dump occurs during a backwash cycle, the solar task is placed on queue until the backwash task is complete, and it is then given immediate priority.
=] AUTOMATIC TIMER [=
The 'Automatic timer' is enabled by pressing the '3' key. Once started, the timer will flash a red "<-- NEXT" indicator showing the next action the timer will take, being either turing the pump ON or OFF for either TIMER1 or TIMER 2. Pressing the 3 key of the RF remote turns the timer off. During timer operations the pump counter is not used, only the timer's schedule, which is on at 7am and 7pm and off at 10am and 10pm. Future release of PPP will have this option programmable by the user.
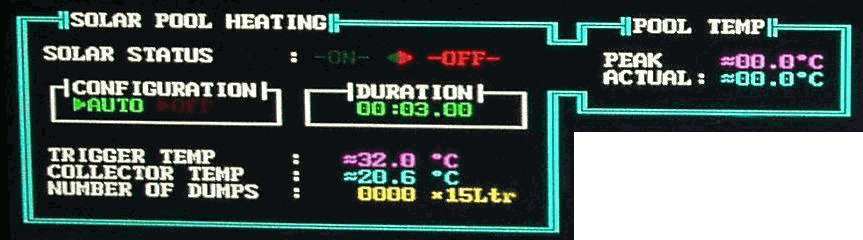
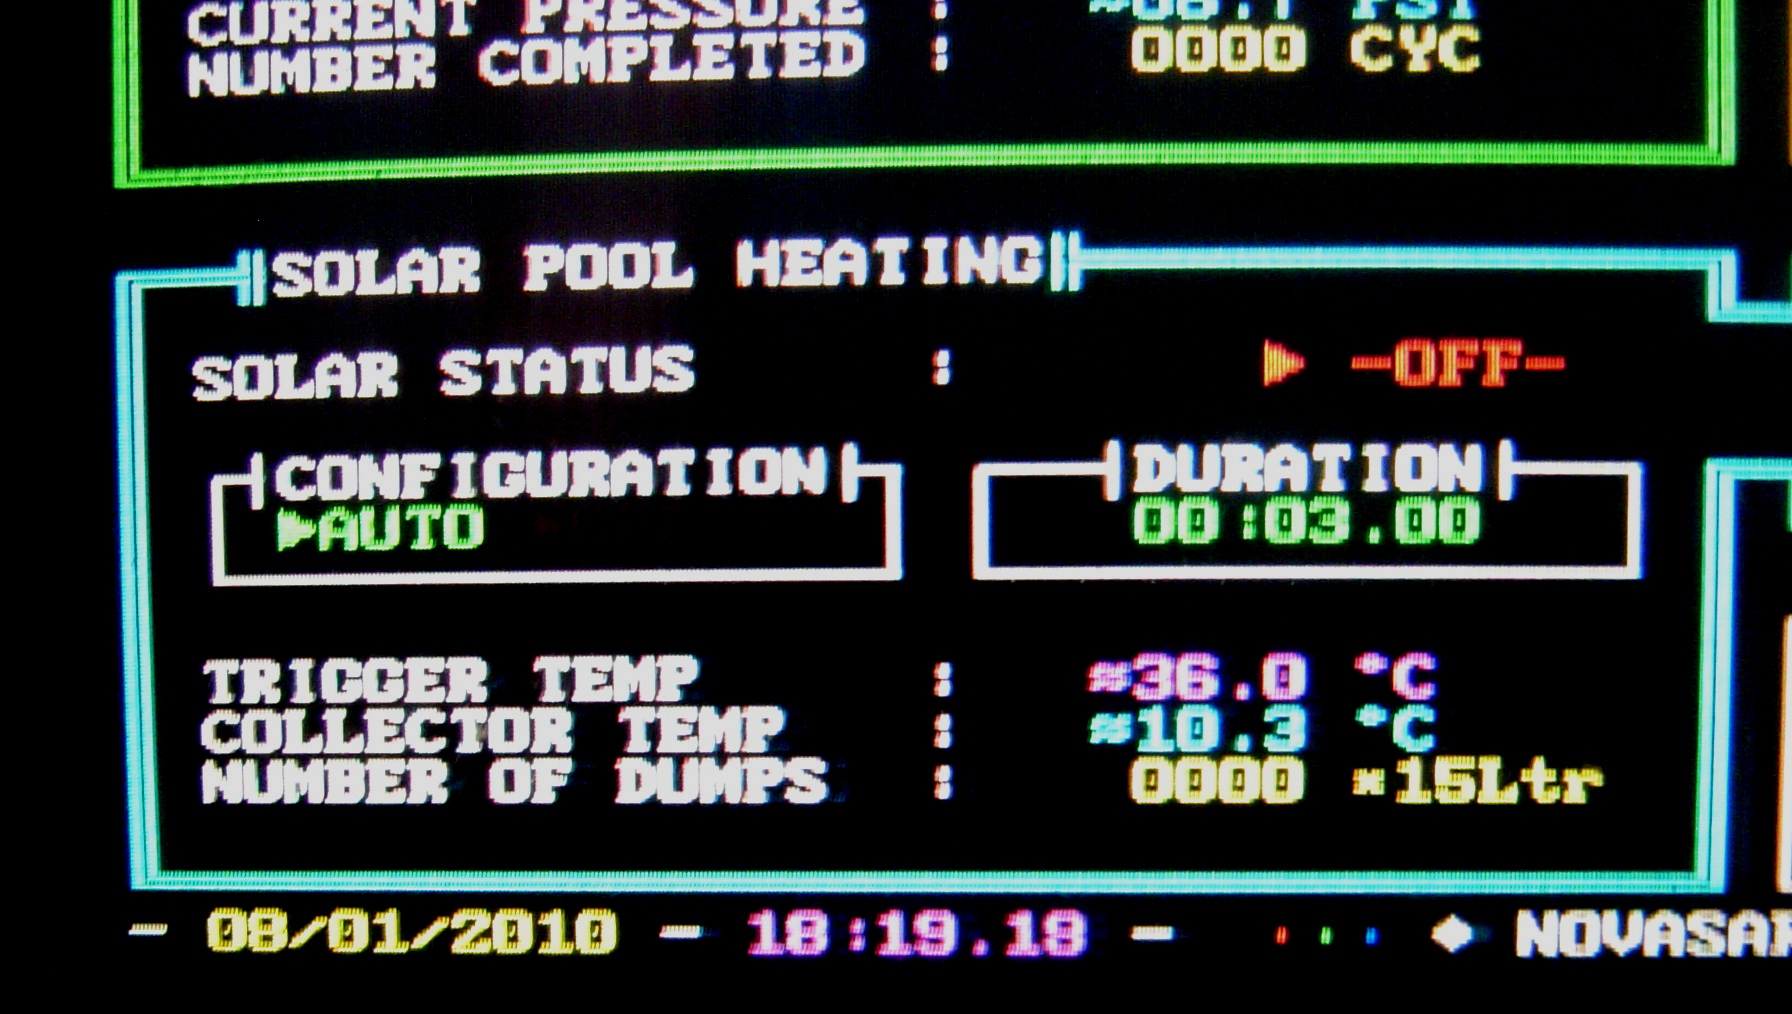
=] SOLAR HEATING [=
The 'Solar Pool Heating' feature is enabled by setting DIP SW0 on the Nanoboard to ON. When enabled, the solar system will wait for information from its sensors to inform it when the solar collector reaches 36 degrees celsius for
five minutes. If the collectors do reach 36 degrees celsius for five minutes, the solar system requests priority use of the pool pump to put the hot water into the pool. If a backwash is initiated during a solar activitiy, the backwash task is place on queue until the solar process has finished its task. The temperature indicator collects data from the solar collectors on the roof by sampling the incoming pool water temperature after 2 minutes of pumping, before recording the lowest and highest termperatures reached.
=] POOL LIGHT [=
By pressing the '7' key on the RF remote for several seconds continually the pool light will turn on. By pressing the '7' key three times, the pool light will turn off.
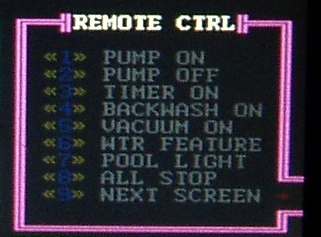
=] REMOTE CTRL [=
The 'Remote Control' indicator window is simply a feedback mechanism for showing which key the system is currently receiving from the RF remote control. When the '10' key is pressed, during the task of setting the time or another configuration setting, all the items in the list illuminate (and are displayed in white).
SETTING THE TIME ON POOL PAD PARTNER
After setting the Nanoboard's DIP SW7 to ON, follow the steps below to set the time: 1. Press the '11' key on your remote control until the time flashes. 2. Use the numbers 1-10 (10 being 0) on the RF remote control to set time. 3. After all digits have been entered the time will go back to the normal display indicating it has been set. Note the hundreds in Century are fixed to 2000.
Press 11 to begin. Hold down the key until the time starts to flash red.
With the display flashing red, enter each digit in the format of DD/MM/YY HH:MM:SS.
As each digit is accepted, it will become solid green.
When all digits have been entered, the time will go back to its normal colours.
BOTTOM ROW
The Bottom Row primarily shows the current time and the last restart date of the system. By Setting DIP SW7 on the Nanoboard to ON, the time is then able to be changed. By setting DIP SW6 of the Nanoboard, the real time clock battery charger is enabled. By default the time is set to locked (SW7 off) and the charger set to ON (SW6 ON).
SYSTEM CONTROL
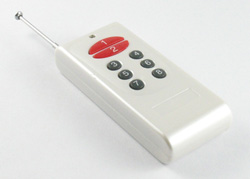
Pool Pad Partner is operated by a standard RF remote control. Only eight keys are required to operate the system, however a further 4 keys are used to configure the various timer options and set information such as the real time clock. Below are three typical RF remotes (either 315MHz or 433MHz) that are shipped with the PPP kit.
A 12 key FOB, model TCP800-12B is available in either 315 or 433MHz and has an 800 metre range.
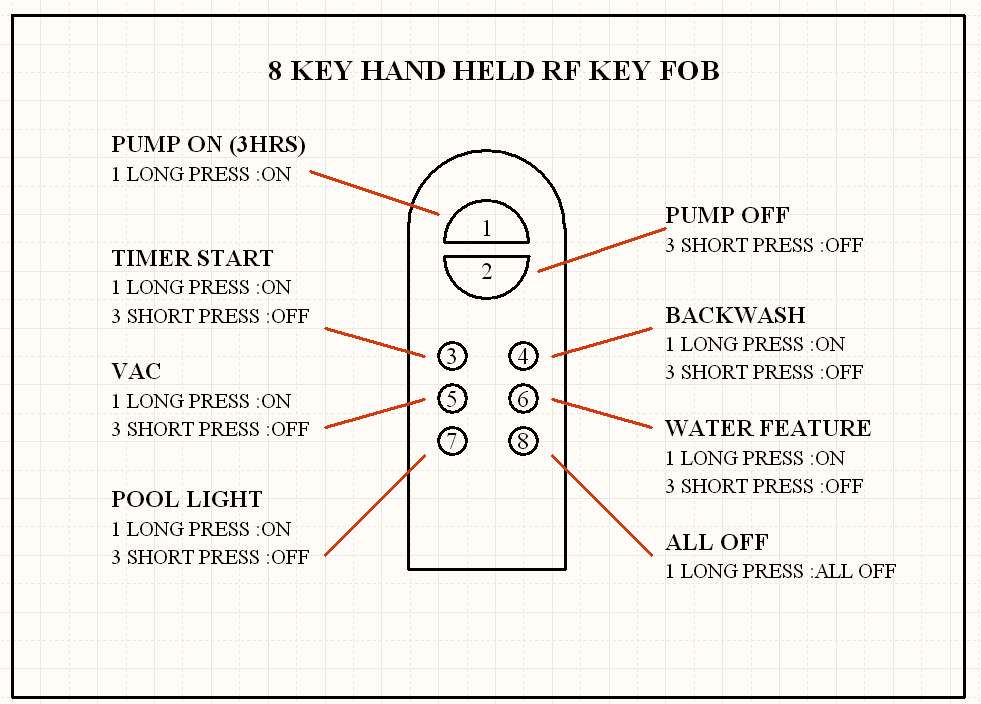
An 8 key FOB, model TCP800-8B is available in either 315 or 433MHz and has an 800 metre range.
A 12 key FOB, model TCP1000-12B is available in either 315 or 433MHz and has a 1KM range.
These are the allocated keys that control the Pool Pad Partner system - this layout suits both the 8 and 12 key versions of the RF remote control.